



How to Send Emails Through Gmail Web with AtomEmailPro
If you want to automate email sending directly through the Gmail web interface, AtomEmailPro lets you create a sending task, select your Gmail accounts, choose an email template, import recipients, and configure how emails are sent.
Unlike an SMTP-based workflow, Gmail web sending uses browser automation to perform the sending process through the web interface.
In this tutorial, we will walk through the complete process of creating and running a Gmail web sending task in AtomEmailPro. You will also learn how account threads work, how to configure browser sessions, and when to use To mode or BCC mode.
Step 1: Check Your Gmail Accounts in Account Management
Before creating a task, make sure your Gmail accounts are ready.
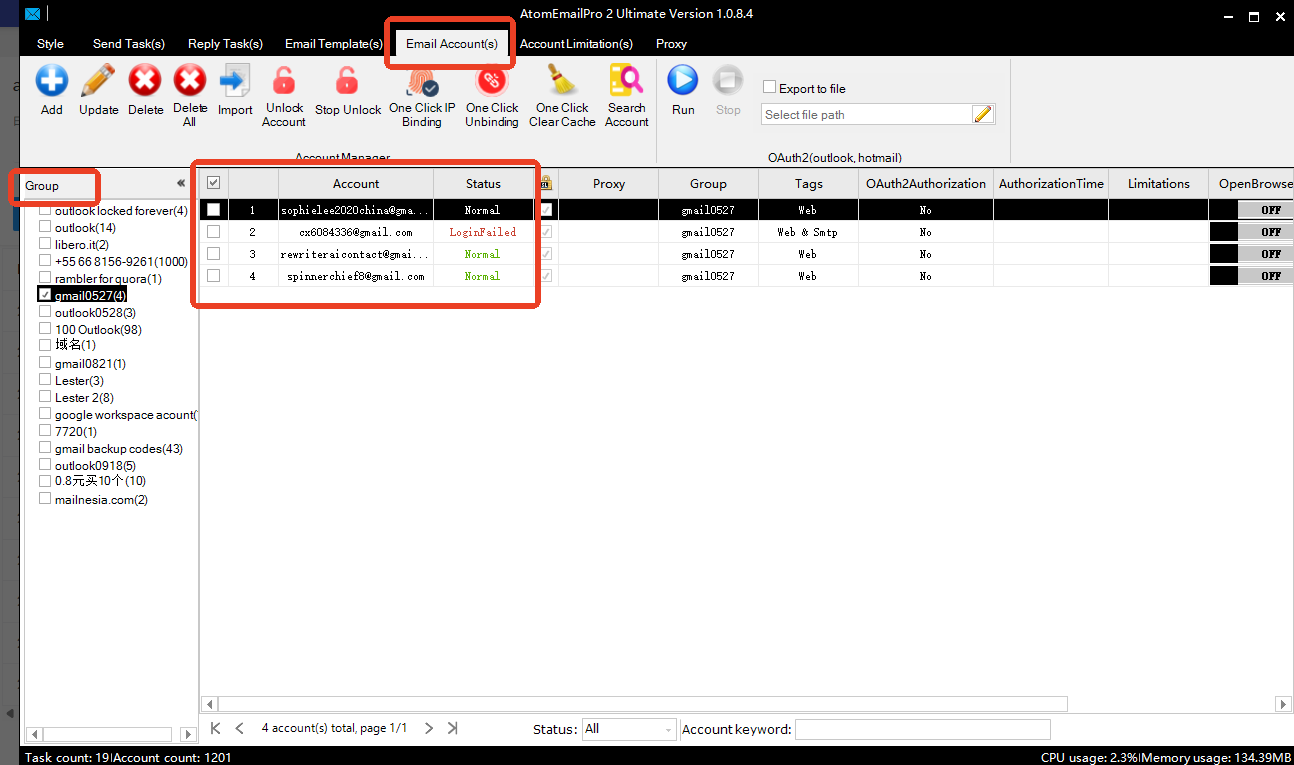
Open the Account Management section in AtomEmailPro and check the login status of the accounts you plan to use.
In this demonstration, the Gmail accounts have already been logged in successfully. They are also organized into a group, making it easier to select the accounts needed for the task.
You do not have to select every account in a group. You can choose only the accounts you want to use for a particular sending task.
For example, if a group contains five Gmail accounts but you only want to use two of them, you can select those two accounts when configuring the task.
Checking account status before starting helps you avoid unnecessary interruptions during task execution.
[Account Management showing the Gmail account group and account login status.]
Step 2: Select Web Sending and Choose Your Gmail Accounts
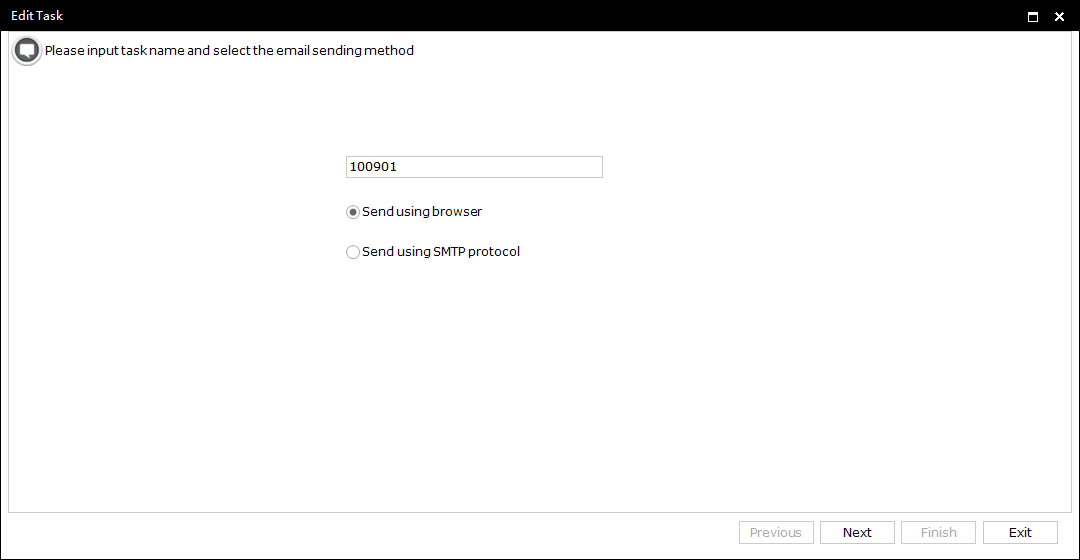
Create a new email sending task and select the web sending mode.
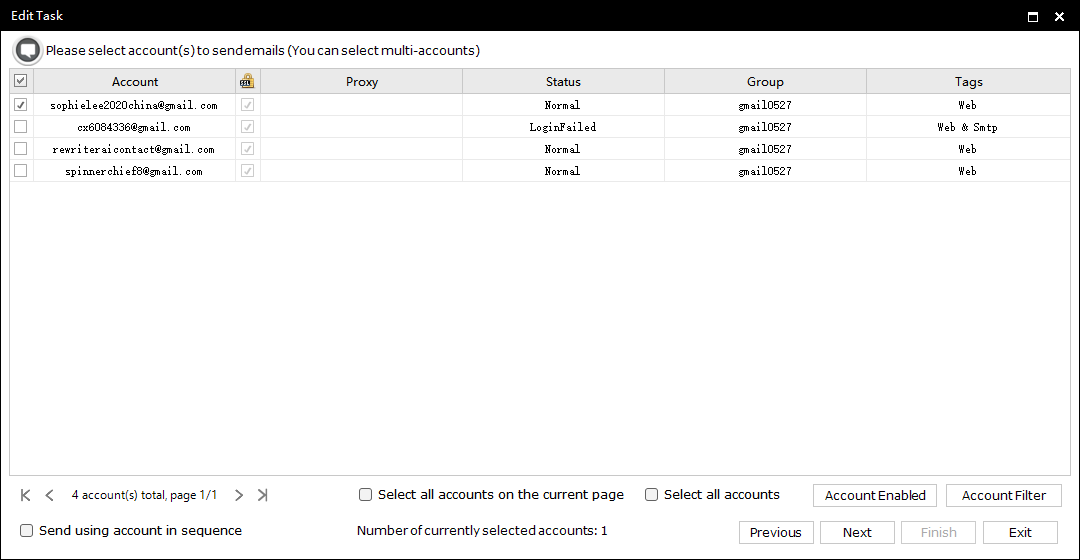
Next, choose the Gmail accounts you want to use. Select the relevant group and then select the individual accounts required for this task.
Once the accounts are selected, continue to the email template step.
At this point, it is important to understand the difference between the accounts selected for a task and the number of browser sessions that can run simultaneously. These two settings work together, but they are not the same thing.
We will explain this in more detail in Step 6.
[Task creation interface showing the web sending mode and selected Gmail accounts.]
Step 3: Select an Email Template
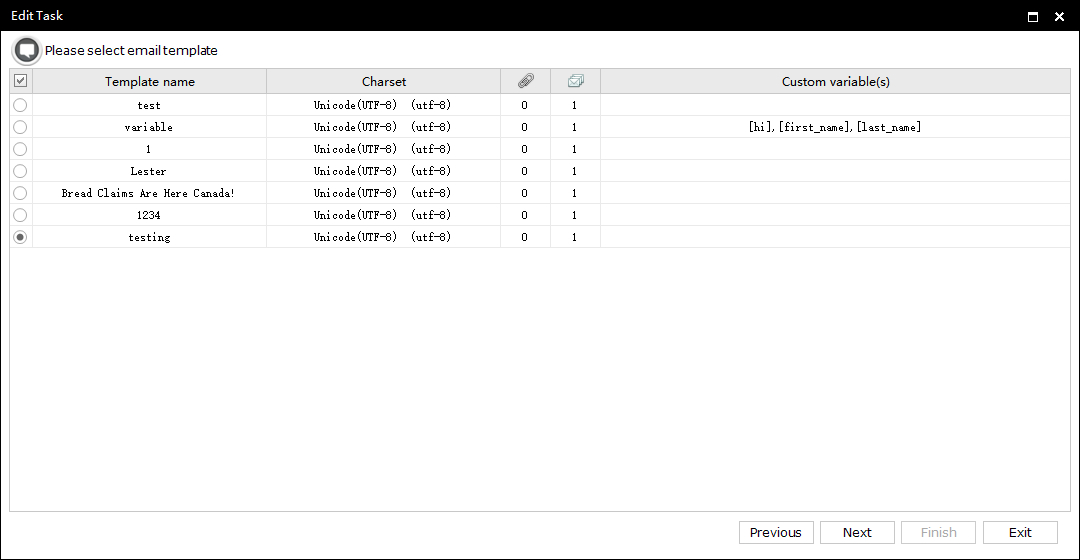
After selecting the sending accounts, choose an email template.
You can prepare your templates in advance in the Email Template section of AtomEmailPro. This means you do not need to write the email content from scratch every time you create a task.
AtomEmailPro supports several useful template features, including email rotation, Spintax, and variables.
Email Rotation
Email rotation allows you to prepare multiple versions of your email content and let AtomEmailPro select a version when sending.
This is useful when you have several approved message variations and want to manage them within a template.
Spintax
Spintax lets you define alternative wording within a piece of content. For example, you can configure different subject line variations instead of using only one fixed subject.
Variables
Variables allow you to insert recipient-specific information into your email template. For example, a template can use a variable such as [name] to insert a recipient's name when the corresponding data is provided in the imported recipient list.
The exact setup depends on how you want to vary the subject or body and how your recipient data is organized.
For a detailed explanation of subject rotation, including multiple subject and body versions, Spintax, and the [subject] and [body] variables, see our separate guide:
How to Use Subject Rotation in AtomEmailPro
Once you have selected the correct template, proceed to the recipient import step.
[Email Template selection interface in AtomEmailPro.]
Step 4: Import Your Recipient List
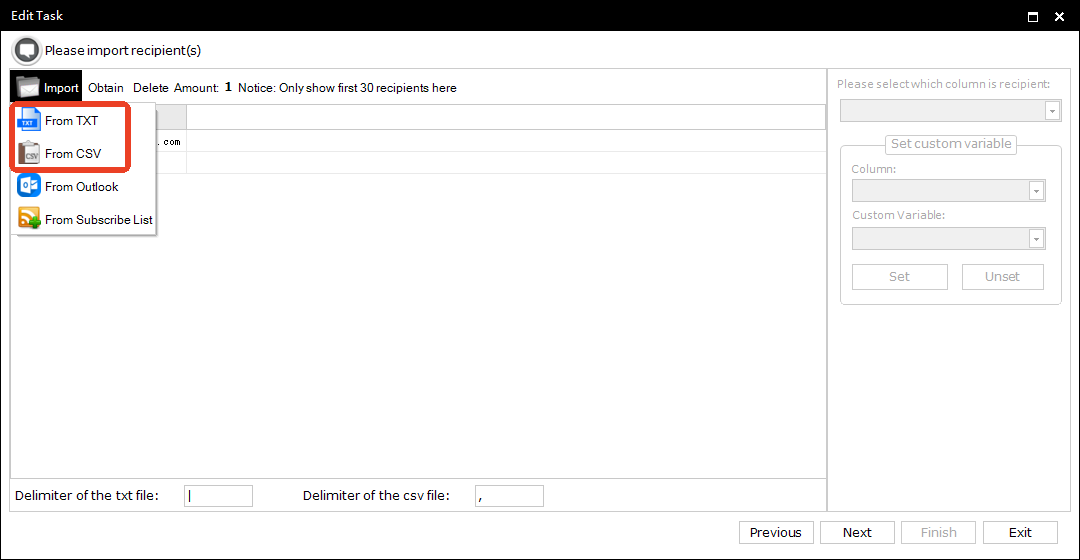
The next step is to import the recipients for your sending task.
Prepare your recipient data in a format supported by AtomEmailPro and import the list into the task.
If your template uses variables, make sure the recipient file includes the corresponding data columns. For example, a template containing [name] needs a matching name field in the imported data.
Before continuing, check that the recipient addresses and any additional fields have been imported correctly.
This is particularly important when using personalized templates, because missing or incorrectly mapped data can affect the resulting email content.
After checking the recipient list, continue to the sending configuration step.
[Recipient import interface showing the imported recipient list.]
Step 5: Choose To Mode or BCC Mode
AtomEmailPro allows you to configure the sending method using To mode or BCC mode.
The two options work differently, so choose the one that matches your intended email workflow.
Option A: To Mode
In To mode, AtomEmailPro sends individual emails to recipients.
By default, the browser closes after one email has been sent. When the same account is scheduled to send again, AtomEmailPro automatically opens the browser for the next sending session.
You can also configure the number of emails to send during a single browser session before the browser closes.
For example, you might configure a session to send a specified number of emails before closing the browser. After that session ends, the browser can reopen when the account is scheduled again.
The basic workflow is:
Open the browser for the selected account.
Send the email or the configured number of emails.
Close the browser at the end of the session.
Open the browser again when the account is scheduled for another session.
This setting controls how many emails are handled during each browser session. It is different from the account thread setting, which determines how many account sessions can run at the same time.
Option B: BCC Mode
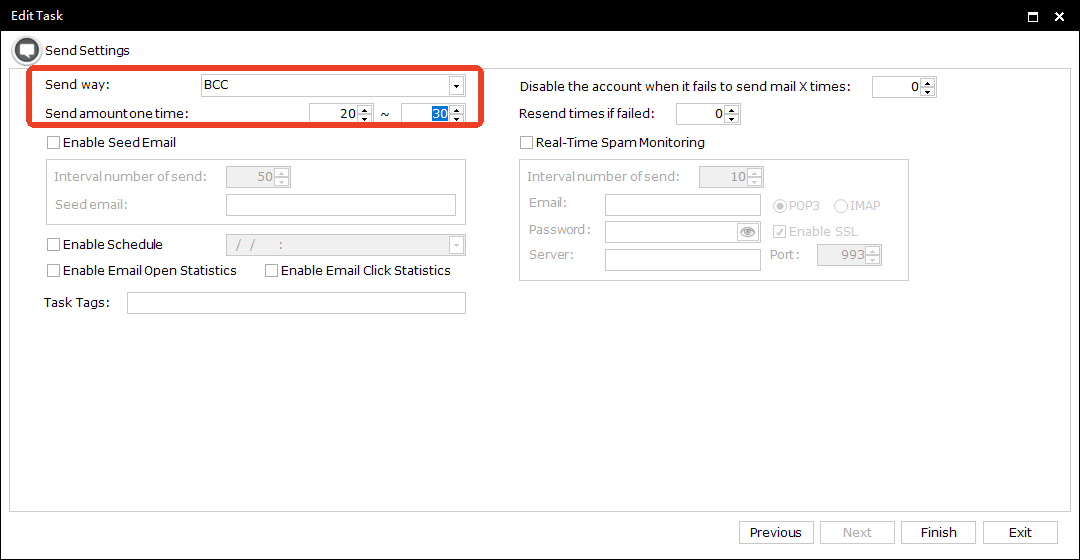
BCC mode lets you place multiple recipients in the BCC field of an email.
In this mode, you can configure the number of recipients included in each BCC sending operation.
For example, if you configure 10 recipients per BCC email, AtomEmailPro uses that setting to determine how many recipients to include in each operation, subject to the remaining recipient list and the task's behavior.
BCC mode is useful when your intended email workflow calls for a single message addressed to multiple recipients. Recipients in BCC generally cannot see one another in the message's recipient fields.
However, BCC is not the same as sending separate personalized emails. If you need each recipient to receive an individually addressed message, To mode is the more appropriate choice.
Which mode should you choose?
To mode: For sending individual emails to recipients, with configurable browser session behavior.
BCC mode: For sending a message to multiple BCC recipients, with a configurable recipient count per operation.
One important consideration: if your email template relies on recipient-specific variables, check the applicable AtomEmailPro requirements before selecting BCC mode. The documented variable-based workflow uses To mode.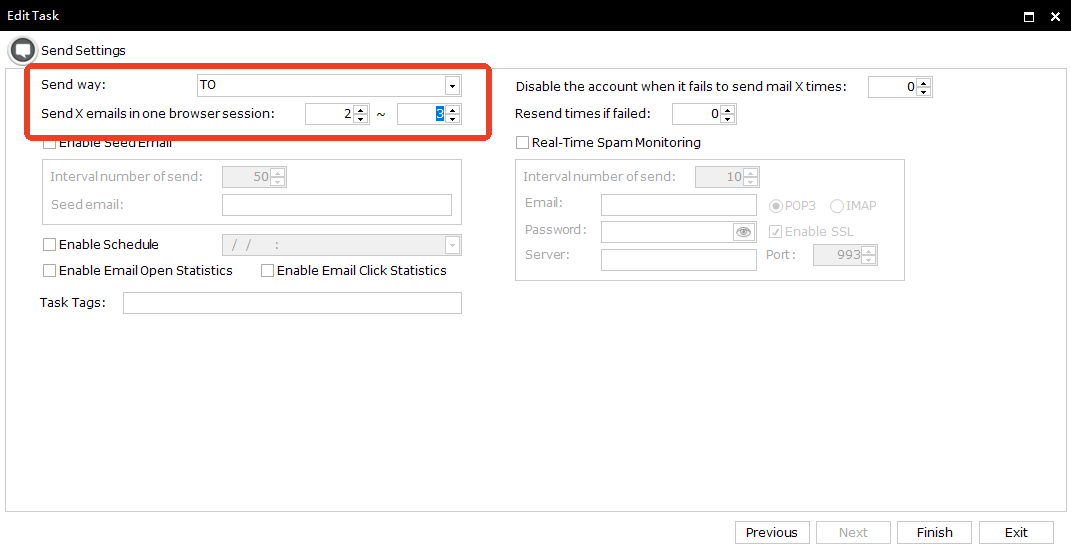
Step 6: Configure the Number of Account Threads in Global Settings
One setting that can easily be misunderstood is the account thread count.
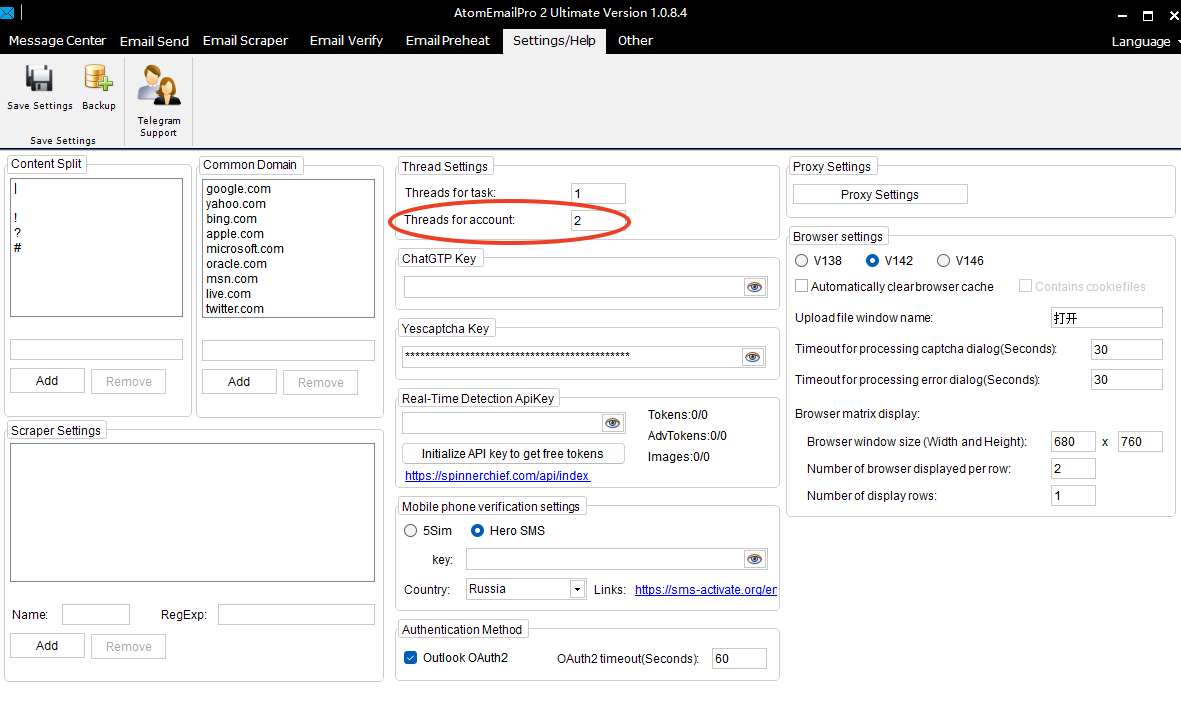
In AtomEmailPro, the number of account threads is configured in Global Settings, rather than being determined solely by the number of emails in the recipient list.
This setting controls how many account browser sessions can run simultaneously.
Example: Set Threads for Account to 2
Suppose you open Global Settings and set the account thread count to 2.
If your sending task has two eligible Gmail accounts selected, AtomEmailPro can run two account browser sessions simultaneously, subject to the available accounts and other task conditions.
However, setting the thread count to 2 does not automatically create two account sessions when the task contains only one selected account.
Consider these examples:
| Account thread setting | Accounts selected in the task | Expected result |
|---|---|---|
| 2 | 2 Gmail accounts | Up to 2 account browser sessions can run simultaneously |
| 2 | 1 Gmail account | Only 1 account browser session can run |
| 3 | 3 Gmail accounts | Up to 3 account browser sessions can run simultaneously |
The key point is that the thread setting defines the concurrency capacity, while the selected accounts determine how many account sessions are available to use that capacity.
If you set the thread count to 2 but select only one Gmail account, AtomEmailPro cannot open a second account browser session for that task because there is no second selected account available.
To use two account threads, make sure the task includes at least two eligible accounts.
How to Configure It
Open AtomEmailPro's Global Settings.
Find the account thread setting, labeled Threads for account in the relevant settings interface.
Set the desired thread count, such as 2.
Save the setting if the interface requires it.
When creating your sending task, select enough eligible Gmail accounts to use the configured concurrency.
Keep in mind that running more browser sessions simultaneously requires more system resources. If your computer struggles to handle the workload, consider reducing the thread count.
Also, do not confuse account threads with the number of emails sent in one browser session. Threads control concurrent account sessions; the session setting in To mode controls how many emails are handled before a browser closes.
Step 7: Review the Task and Start Sending
Before running the task, review your configuration.
Check the following:
The correct sending mode is selected.
The intended Gmail accounts are selected.
The correct email template is assigned.
The recipient list has been imported successfully.
Any variables used in the template have matching recipient data.
To mode or BCC mode is configured as intended.
The account thread count in Global Settings matches your planned workload.
The selected accounts are sufficient to use the configured thread capacity.
Once everything is ready, start the task.
AtomEmailPro will execute the sending process using the selected accounts and settings. In To mode, the browser opens for the account scheduled to send, performs the sending operation, and closes according to the configured browser session behavior.
If multiple account threads are available and enough eligible accounts have been selected, multiple account browser sessions can run at the same time.
Watch the actual sending process to confirm that the task behaves as expected.
If you encounter a problem, check the account login status, template configuration, imported recipient data, and task settings before determining the cause.
Watch the AtomEmailPro Gmail Web Sending Demo
The video below demonstrates the process of creating a sending task and running an actual Gmail web sending session in AtomEmailPro.
Watch the demonstration to see how the account selection, template selection, recipient import, sending mode, and browser-based sending process fit together.
YouTube tutorial:
You can follow the video while reading the steps above to understand how the task is configured in the software.
Conclusion
Creating a Gmail web sending task in AtomEmailPro involves selecting your accounts, choosing an email template, importing recipients, configuring the sending method, and starting the task.
There are two settings worth remembering:
Threads for account in Global Settings controls how many account browser sessions can run simultaneously. The task must contain enough eligible accounts to use the configured thread count.
The browser session setting in To mode controls how many emails are handled during a browser session before it closes.
Email templates also support useful features such as email rotation, Spintax, and variables, allowing you to organize different message versions and recipient-specific content.
Once you understand how these settings work together, you can configure Gmail web sending tasks more confidently and troubleshoot common setup mistakes more effectively.